|
|
||
|---|---|---|
| LICENSE | ||
| README.md | ||
| SLGreen.ino | ||
README.md

SLGreen turns your Arduino equipped with a MCP2515 into a Serial to CAN bridge using the SLCan / CAN232 / Lawicel protocol. This project facilitates usage of CAN bus on your computer by allowing you to make cheap CAN interface with your Arduino and those chinese CAN boards.
Hardware
Components needed
SLGreen require two compoments to function properly :
- An MCU compatible with Arduino (Any Arduino board, ESP32...)
- An MCP2515 controller board, chosen according with the MCU logic voltage
Wiring
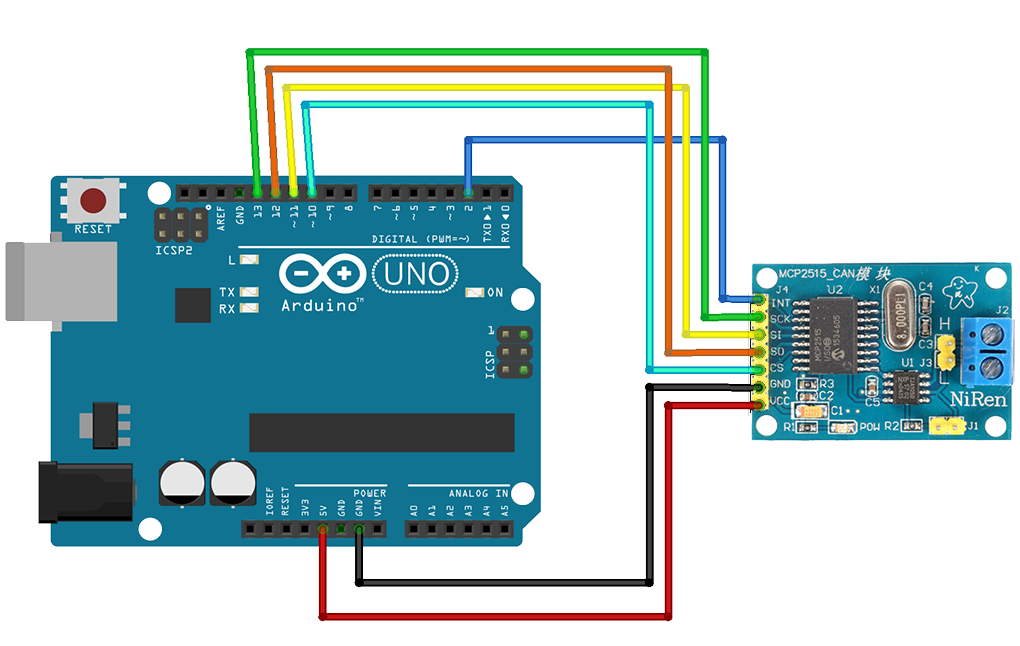
The wiring of the MCP2515 module is basically the same as any SPI slave device :
- MOSI, MISO, SCK : Check your board documentation
- SS : Pin 10
The INT pin doesn't need to be connected
Here is a wiring example for an Arduino Uno :
Installation instructions
To install and use the SLGreen software, follow these steps:
- Clone this repository using
git cloneor download it directly as ZIP. - Install the dependencies listed below using the Library Manager of the Arduino IDE.
- Check the configuration options to make sure your SLGreen board will work.
- Open
SLGreen.inowith the Arduino IDE and upload it to your Arduino.
Dependencies
- MCP_CAN Library: This project uses the
mcp_canlibrary by coryjfowler for communication with the MCP2515 CAN controller. It can be found here: MCP_CAN_lib.
Configuration
Several configuration options are available at the top of the SLGreen.ino file. Depending on your hardware and your needs, it may be useful to modify them.
⚠ In any case, you should take a look at the table below to check if the default values are correct for your usage ⚠
Parameters Table
| Parameter | Default Value | Recommended/Available Values |
|---|---|---|
MCP_CS |
10 |
Any value making your hardware work |
MCP_FREQUENCY |
MCP_8MHZ |
MCP_8MHZ, MCP_16MHZ, MCP_20MHZ |
SERIAL_SPEED |
115200 |
115200, 150000, 250000, 500000, 1000000, 2000000 |
DEFAULT_CAN_SPEED |
CAN_500KBPS |
CAN_10KBPS, CAN_20KBPS, CAN_50KBPS, CAN_100KBPS, CAN_125KBPS, CAN_250KBPS, CAN_500KBPS, CAN_1000KBPS |
Details
MCP_CS: Define the Chip Select pin of the MCP2515MCP_FREQUENCY: Sets the clock frequency of the MCP2515 CAN controllerSERIAL_SPEED: Defines the baud rate for serial communicationDEFAULT_CAN_SPEED: Sets the default speed for the CAN bus, in case the computer doesn't choose one
Usage with Linux
First of all, you need the can-utils package
$ sudo apt install can-utils
Then use the commands below to start the slcan daemon
$ sudo slcand -S 115200 -s 6 -o /dev/ttyUSB0 can0
-S: Serial baud rate. Put the same value asSERIAL_SPEED-s: CAN speed. Check the Lawicel documentation to choose the speed you want-o: Send an Open command (explained in Lawicel documentation)/dev/ttyUSB0: Your Arduino serial portcan0: The name you want for your SocketCAN interface
Finally, bring the interface up
$ sudo ip link set can0 up
You can now use your preferred tools to manipulate the CAN ! (candump, SavvyCAN...)
SLCAN (Lawicel) Implementation
SLGreen implements the SLCAN (Lawicel) protocol to allow interactive communication with the CAN bus via a serial port. To get more details about this protocol, check this link
Implementation status
S: Configure CAN speed (speed 7 / 800Kbps not implemented)s: Alternative configuration of CAN speedO: Open CAN busL: Open CAN bus in listen-only modeC: Close CAN bust: Send standard CAN frameT: Send extended CAN framer: Send standard RTR frameR: Send extended RTR frameP: Retrieve received frameA: Retrieve all received framesF: Retrieve status flagsX: Configure if frames are directly send when received (forced ON)W: Filter mode settingM: Acceptance Code Registerm: Acceptance Mask RegisterU: Define a new serial baud rateV: Return software versionN: Return serial numberZ: Configure if timestamp is included when transmitting received frames (forced OFF)Q: Save the configuration for the next startup
Contribution
Contributions are welcome !
A lot of features are yet to be integrated into this project, so any help doing this will be greatly appreciated !
If you wish to contribute, please fork the repository, create a new branch for your changes, and submit a pull request for review.
License
This project is licensed under the MIT License. For more information, please consult the LICENSE file or visit https://opensource.org/licenses/MIT.
Contact
For any questions or suggestions, please feel free to contact me :
- Website: theiremi.fr
- Email: contact@theiremi.fr